
How to Add Your Substack on Google Search Console
And why it's a valuable tool for Substack writers!


One of the ways that I was able to find “paid subscribers” for my Substack is through Google Search. I found out that after clicking on a link to my site, some people would subscribe to my Newsletter to read my paywalled articles that ranked well on Google.
However, if you don’t have a good tracking mechanism for this, it’s like working blind most of the time. You will never truly know what keywords are working well for you. And you won’t know the extent of traffic that you can still get if you could only optimize your articles more.
So if you’re serious about growing your Substack, you should monitor your Substack’s performance when it comes to search engines. You also want to get your content indexed as fast as possible.
To accomplish these, you can start by submitting your site to Google Search Console.
What is Google Search Console?
It is a free Google tool used by business owners, marketers, web developers and SEO experts to help monitor and troubleshoot their website’s performance on Google Search.
While you don’t need this to get your site indexed by Google, this can help your site to get indexed faster. This also comes with various analytic tools to help you see your site’s top search queries and clicks on your most popular content.
Being informed where your search engine traffic comes from and whether your site has any indexing issues are important if you want to optimize your site’s search engine performance.
Here are the steps to submit your Substack to Google Search Console:
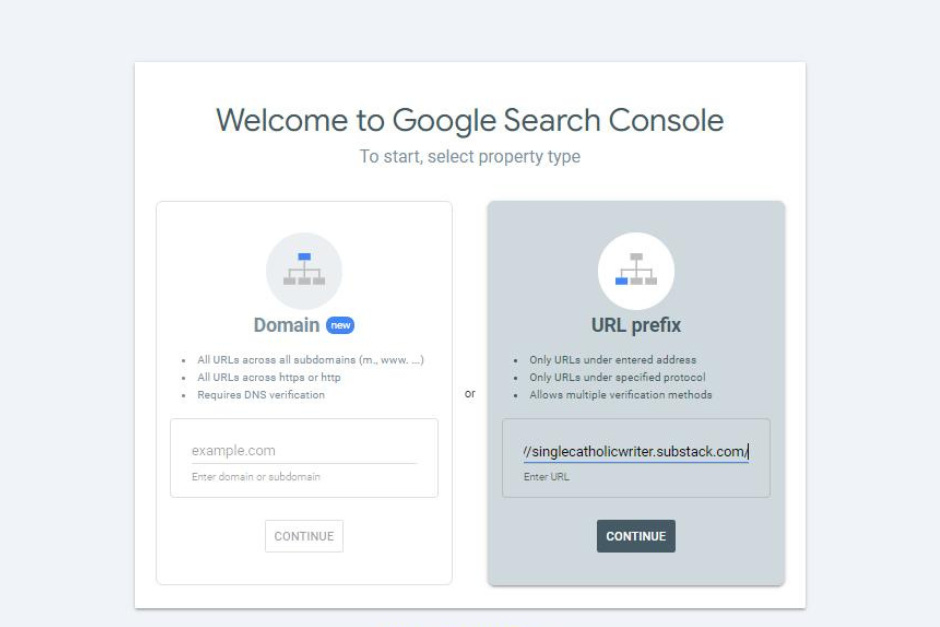
1. Add your Substack link
First, make sure you are signed in to your Google account. Then, go to this link:
https://search.google.com/search-console/welcome
Enter you Substack URL for URL Prefix (at the right box) then click “Continue”.
2. Verify your site
Now we need to get a piece of code that we can put on our Substack. To do this, scroll down a little and you will find the option to add your “HTML tag”. Simply click this option to find the code we need.

Now copy the meta tag that looks something like this:
<meta name=”google-site-verification” content=”_______” />

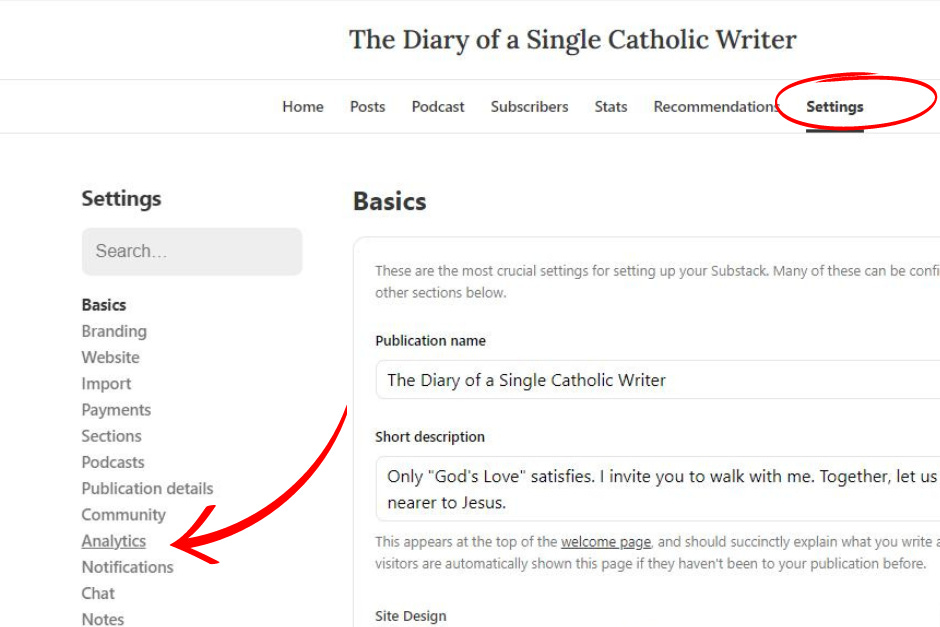
Go to your Substack “Settings” then select “Analytics”
Paste the code on the “Google Site Verification” box
Click the “Save” button.

Go back to Google Search Console and click the “Verify” button.

3. Create a sitemap
From the dialog box that pops up, click “Go to property”.

Click “Sitemaps” on the left column.
Type “sitemap.xml” in the box and click the “Submit” button.


Congratulations! Now all you have to do is wait a few days to see the relevant metrics for your site.
Do check your stats from time to time to see how you can increase your subscribers by improving your search engine performance.
To support Jocelyn in her “full-time mission” as a Catholic writer, please consider subscribing, upgrading your subscription, buying her books or giving her a tip via Ko-fi.
Access all articles on our Writer’s Resources by becoming a paid subscriber!
Thanks. I did this and now awaiting results.
Thanks for the article! But it looks like Substack no longer "Google Site Verification" option. Do you know of another way to do this?